Showing posts with label rice. Show all posts

Monday, May 8, 2017

Neer Dose

0

   
Neer Dose is a specialty from coastal Karnataka. It's simplicity has spread to other parts of India now, mainly through Mangalorean restaurants. It's a very simple recipe made with handful of ingredients mainly rice, salt and water. Neer in Kannada/Tulu means water, in kundapur kannada it's also called Tellin Dose (thin dose). I add onions and a little coconut that makes it more tastier. There are other variations to this simple dose. Spicy version that my grandma used to make. When there was no time for elaborate cooking she would add some dry red chillies, cumin and coriander seeds while grinding the rice and eat the spicy neer dose without any sides/dips (chutney/curries). My mother also makes a healthier version by mixing half of finger millet seeds (ragi) and half raw rice to make the batter. It takes very little oil to make it, you can also skip the oil if you are making it on nonstick pan but I prick a fork into half onion and use it to grease the pan a bit. I somehow don't like the oilfree neer dose :-)


Here is the recipe that I learnt from my mother when I was in high school. It was such a proud moment for me that I learnt to make perfect neer dose like her. Since then I wanted to show off my skill whenever my mother made it. The story continued even after I got married and started living with my in laws. When we had guests at home my job was to make just neer dose :-) It's not a rocket science but many still fear trying it. It will take couple of really thick doses before one can learn to sprinkle it the right way and make good neer dose. It's so thin that you can easily eat 4-5 of them in one sitting. Read on for the ingredients and method.


Ingredients:
1 cup Sona masoori Raw Rice
2-3 tbsp of fresh coconut
1 small onion (optional)
Salt to taste
Oil to grease the pan

Method:

1. Wash and soak rice in enough water for 2-3 hours (1-2 hours is sufficient if you are using a wet grinder/stone grinder).


2. Drain the water from rice and put it in the mixer jar, add coconut and grind to smooth paste. Do not add more water while grinding. Check the batter between your fingers, it should be smooth in texture.


3.When the batter is almost done add the sliced onions and grind for 2 more minutes.

4. Remove in a big pot, add salt to taste and enough water to make thin batter. The consistency is similar to Rava Dosa. Do not add more water at once, check the consistency by making a dose and add water as desired.

5. Heat a pan/tawa and rub a little oil with the help of a cut onion or banana stem and sprinkle the dose batter to form a thin dose (similar to Rava Dose). Cover and cook for 30 seconds and remove it. Fold as you like.


6. Serve with coconut chutney /coconut-jaggery mixture or even spicy curries. 


Notes: 
1. Do not add too much water at once, try to sprinkle the batter on the hot pan and see if it makes thin dose with pores.

2. If the pan is too hot you can not make thin dose as it will not spread properly and makes thick ones. 


3. It just needs a little practise to play with water for right consistency and adjust the flame as needed to make thin dose. 

Thanks for reading, please comment and let me know if you try it:-)

Read More »

Wednesday, August 31, 2016

Tomato Bath | One pot Spicy, Tangy Tomato Rice

0

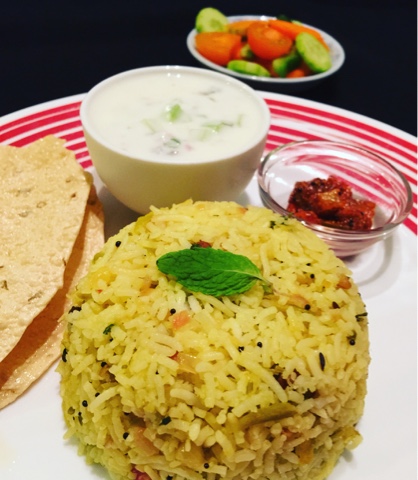
When I was working in Bengaluru, I had a colleague, her mom used to cook super delicious food. During lunch hour we all used to wait for her to open her lunch box and before she knew it would be empty. One of the dishes that I liked the most was tomato bath. Those days I was all for simple cooking as I hardly knew anything and I had a simple way of making this one pot quick tomato rice but it never tasted as good as the one she got. I pestered her to get the recipe from her mom for many days and finally got the recipe via a phone call :) Sometimes we do crazy things for food ;) It was worth the effort as the taste is beyond delicious!! The main difference was she cooked it in coconut milk along with methi (fresh fenugreek leaves) and Mint leaves. The flavor and the taste is unbeatable and the best thing is it gets done in 30 mins without much mess around.

I have saved this recipe from many years and it's still my favorite. You must try this to believe me:) Let's get cooking!

Ingredients:
Ripe tomato : 4
Rice: 2 cups (preferably long grained Basmati)
Onion: 3
Ginger garlic paste: 1 tbsp
Coriander powder: 2 tbsp
Cumin powder: 1 tbsp
Red Chilli powder:  1 tbsp
Coriander leaves: 1 cup
Fresh Methi (Fenugreek leaves): 1 cup
Mint leaves: 1/2 cup
Coconut Milk:  2 cups
Oil/Ghee: 2 tbsp
Cinnamon stick: 1
Cardamom: 3-4
Cloves: 3-4
Salt to taste
Lemon juice: 1 tbsp

Method:

1. Wash and soak rice in enough water for 30 mins. In the meantime slice onions, chop tomoatoes and roughly chop coriander, mint and fenugreek leaves.

2. Heat oil in the pressure cooker and add whole spices - cardamom, cinnamon and cloves. Saute until the oil is fragrant.

3. Add sliced onions and saute until the onions turn golden brown, add ginger garlic paste and saute until the raw smell disappears.

4. Add chopped tomatoes, all greens and spice powders - coriander -cumin powder and red chilli powder and salt .Mix and let it cook for 2 mins.

5. Add soaked rice and fry for 2 mins, add 2 cups coconut milk and 1.5 cup water and bring to boil. Adjust the seasoning and close the lid and pressure cook for 3 whistles.

6. When the pressure has released open the lid and add freshly squeezed lemon juice.

7. Mix gently and serve with chilled curd/raita.

Notes:
1. You can replace fresh fenugreek leaves with 1 tbsp kasoori methi (dried fenugreek leaves)
2. I used store bought coconut cream, you can also grind the fresh coconut at home and squeeze the coconut milk which will even taste better:)

Read More »

Monday, May 23, 2016

Kuska Rice and Boneless chicken biriyani | Learn how to make plain biriyani rice and boneless Chicken Biriyani

3

I am back with another biriyani recipe. The chicken biriyani that I made before was with chicken on bone cooked in dum style. Today I tried boneless version without dum cooking. I was trying to replicate my childhood favorite rice item Kuska Rice from my father's hotel. It's nothing but plain biriyani rice.  Me and my sisters loved to eat this kuska rice with sherva (Plain Savji curry). In the hotel they used keep the Kuska rice ready and prepare chicken/Egg/Mutton or Veg biriyani with it as and when the order was placed.


So this Kuska rice came out really well and it had all the flavors of a good biriyani. Then I thought of making a chicken masala and preparing biriyani with it. I had some boneless chicken in store so out came this delicious chicken masala and the biriyani! It tasted just like the famous Meghana Boneless Biriyani. My family loved it. This has all the qualities to be out next family favorite dish:) I have noted down the recipe to make Kuska Rice and the boneless chicken biriyani with it. You can replace it with chicken on bone. It was just another pefect Biriyani :) Please read on for the recipe.

Kuska Rice /Plain Biriyani rice recipe: 
Ingredients:
Rice: 3 cups
Green chillies: 4-5
Onion: 3
Ghee/Oil: 3 tbsp
Caraway seeds (shahijeera): 1 tsp
Cardamom pods: 3-4
Clove: 4
Cinnamon stick: 1
Bay leaf: 1
Ginger garlic paste: 1 tbsp
Yogurt/curd : 1/2 cup
Chopped coriander and mint leaves: 1 fistful
Salt to taste
Safrron: 1 pinch
Rose water: 1 tbsp (Optional)
Kewra Water: 1 tbsp (Optional)

Preparation:
1. Wash and soak rice in enough water for 30 mins
2. Thinly slice onion, slit green chillies, chop coriander and mint leaves.
3. Soak saffron in 2 tbsp of warm milk or water.

Method:
1. Heat ghee/oil in a thick bottomed wok, add caraway seeds and whole garam masalas - clove, cardamom, cinnamon and bay leaf. Sauté until the ghee is fragrant.

2. Add thinly sliced onion and fry until onion turns to golden brown and crispy.

3. Now remove 2 tbsp of fried onions and keep it for garnishing. Add ginger garlic paste and green chillies, sauté until the raw smell disappears.

4. Add beaten yogurt, salt, chopped mint and coriander leaves and mix well. Cook for 1-2 minutes.

5. Add soaked rice and fry it for 2-3 minutes. Add 4.5 cups of water (1.5 cups for 1 cup of rice)

6. When it starts boiling cover with the tight lid and cook until the water on top is dried.

7. Open the lid sprinkle 1 tsp of rose water and kewra water and saffron milk  and put the lid back and keep it on low flame for 15 mins and turn of the flame.

8. Allow it to cool for 10 mins, open the lid and mix the rice up slowly without breaking it.

Garnish with fried onions and the rice is ready. You can serve it some spicy gravy of your choice or make biriyani with it. Read on to to know how to make boneless chicken biriyani.


Boneless Chicken Masala for Biriyani:

For Marinade:

Lemon Juice: 2 tbsp
Red chilli powder: 2 tsp
Turmeric: 1/2tsp
Coriander powder: 2 tsp
Cumin powder: 1 tsp
Biriyani powder: 2 tsp
Egg: 1
Corn Flour: 2 tsp
Salt to taste
Boneless chicken cubes: 500 gms

In a large mixing bowl add all the items listed for marinade and mix well. Add boneless chicken pieces and mix. Keep it refrigerated for 2 hours.

For chicken masala:

Ingredients:
Ghee: 5-6 tbsp.
Cashews: 10-12
Onion: 2
Green chillies: 2
Ginger garlic paste: 1 tbsp
Mint and coriander leaves: 3 tbsp
Yogurt: 1 cup
salt to taste

Method:
1. Heat ghee in a pan and fry cashews until golden brown, remove and keep aside.

2. To the remaining ghee, add sliced onions and fry until golden brown, add ginger garlic paste and saute until the raw smell disappears.

4. Add slit green chillies, salt, coriander and mint leaves saute for a while.

5. Mix in marinated chicken and fry for 5-6 minutes. Add a cup of beaten yogurt and cook until the chicken is done. It shouldn't be too dry, should be of thick gravy consistency. Add a little water if required.

6. Squeeze in lemon juice and the chicken masala is ready to go!


Serving:
1. In a serving bowl, add the plain biriyani rice and top it up with chicken masala and garnish with fried cashews, fried onions, chopped mint and coriander leaves. Serve hot with yogurt raita.


Notes:
1. Do not over cook the rice, Biriyani rice grains should be separated in a good biriyani :) you can add orange food coloring if you like the rice to be colorful.

2. Adding rose water/Kewra water is optional but recommended as it really brings the biriyani flavor out.

3. You can adjust the chicken masala according to your taste, you can add tomato puree or also can add 2 tbsp cream to make the gravy rich.

Please click here to know how to make biriyani powder.--> Fresh Biriyani Powder in a Jiffy

Read More »

Saturday, May 7, 2016

Mosaranna | Curd Rice | Simple and comfort food

0


Weekends are for my food experiments. I usually try new recipes over the weekend. It was a bit different this time and we decided to dine out at our favorite Chinese restaurant "Old Chengdu" in china town. Both of us like spicy food and this restaurant offers the best chengdu/schezuan dishes. They cook with chilli oil and Sichuan peppers, we devoured our favorite super spicy chilli chicken and double cooked potatoes. 

Wondering what am I talking about? This is supposed to be a curd rice recipe:) yes! I am coming to it..last thing first, the next day we had a burning stomach (no regrets!! as the aroma and taste of chengdu food still lingered on). And I had to resort to something humble that will heal the burn instantly.  Our very own South Indian soul food Curd Rice came to our rescue. It takes a very few and humble ingredients to make this complete meal. It's also good for digestion, usually all the South Indian meals end with curd rice. You can simply eat plain rice and curd with a pinch of salt and also can make it a bit rich with fried cashews, raisins or fresh fruits with the mustard tempering. Here is my way of making this comfort food, inspired by my friend's mom's recipe. 


Ingredients:
Left over/Fresh Rice: 2 Cups
Thick Curd: 1.5 cups
Milk: 1/4 cup
Salt to taste
Coriander Leaves: 2 tbsp
Pomegranate seeds : 1/2 cups
Oil:1 tbsp
Split black gram /urad dal : 1 tbsp
Mustard: 1 tsp
Chopped Curry Leaves: 1tbsp
Green chillies: 1-2
Raisins : 2 tbsp


Method:

1. Take rice in a bowl, make sure its cooled down if you are using fresh rice. Add curd, milk, salt, chopped coriander leaves and pomegranate seeds and mix well. 

2. Heat oil in a tempering pan, add split black gram and then mustard seeds, when it splutters add chopped green chillies and curry leaves. Saute for 30 seconds. Then add in raisins, saute for a while and turn off the flame.

3. Mix this  tempering to the rice and serve with the pickle of your choice.


Read More »

Saturday, March 19, 2016

Chicken Dum Biriyani | Restaurant style chicken biriyani

0
Side effects of being married to a big foodie!! One way or the other you are always thinking about cooking something new for your better half who just loves to eat. I was a simple rice - rasam type girl before marriage and in last 5+ years I not only learnt cooking but started enjoying cooking so much that I started my own blog. Doesn't it feel good to make something and get appreciated for it every time :-) 

Some side effects of being with a foodie or being a foodie yourself are so glaring.
1. You are just finishing your lunch and you start thinking about cooking dinner.
2. In the supermarket , you are almost like a robot scanning the vegetables/meat - your mind starts thinking about all possible recipes and what you can cook this week.
3.You have no issues with your spouse inviting guests for dinner every other weekend.It's an even prouder feeling to receive appreciation from guests ;-)

Do you have any other side effects??- do comment below so we can laugh a bit together:))

Every time there are guests coming over, I start planning  the menu and this Hyderabadi Chicken Biriyani has to be the first in the list. Then I go on adding my specialties such as Roasted chicken, Fish Rava fry or Masala fry, Chicken sukka etc as certified by the foodoholic of my house aka my husband:) 


There are 100s of variations of making biriyani, the process and the ingredients differ a lot but who can beat the taste of a biriyani with the aroma of spices, fried onions, fresh mint leaves etc.  This post has been in the draft for the longest time and finally I am posting it with all my love for Biriyani. The whole process of making this biriyani is very interesting and I split it into three categories - marinating the chicken with the spices, cooking the rice to the right consistency to be layered and finally dum cooking the biriyani in a handi (pot).

So lets get started with the ingredients, do not faint looking at the long list, after all it's not everyday one makes such elaborate and special dish :-))

Ingredients:
Chicken on bone: 1 kg
Long grained basmati rice : 1 kg
Shahi Jeera/ caraway seeds: 1 tsp
Cloves: 3-4
Oil: 1tsp
Saffron: few strands
Water/Milk: 2-3 tbsp 
Salt to taste
Ghee: 3 tbsp
Broken Cashew Nuts: 15-20
Rose water: 1 tbsp (Optional)
Kewra water: 1 tbsp (Optional)

For Marinade:
Biriyani powder : 3 tbsp
Red chilli powder: 1/2 tsp
Cumin powder:1 tsp
Coriander powder:1 tbsp
Turmeric powder :1/2 tsp
Green chillies: 3-4
Ginger garlic paste: 1 tbsp
Curd: 1 cup
Oil: 2 tbsp
Salt to taste
Lemon juice: 2 tbsp
Chopped Mint leaves: 1/4 cup +1/4 cup 
Chopped Coriander leaves:1/4 cup +1/4 cup
Fried onions: 1/4 cup +1/4 cup
Method:
Marinating the chicken:
1. Take all the ingredients for marinade and mix well. Save half of the chopped coriander leaves, mint leaves and fried onions for dum cooking. Add cleaned chicken pieces and marinate for 3-4 hours or overnight in the refrigerator.


Cooking the rice:

2. Wash and soak rice in enough water for 1 hour. Heat water in a big pot and add salt, 1 tsp oil, caraway seeds and cloves. when the water starts boiling add the soaked rice. We are going to cook it partially. When the rice starts popping up take a grain and press it with your fingers, it will break into 2. It should be half cooked at this stage. Turn off the flame and drain the rice in a colander. Do not overcook the rice as it will get mushy after Dum cooking with Chicken.

Dum cooking the biriyani.
3. Take a thick bottomed pot with a tight lid and heat ghee in it. Fry Cashew nuts and take it out. Soak Saffron in warm milk or water and keep aside.

4. Now add marinated chicken to the remaining ghee in the pot and gently mix it.

5. Add half cooked rice on top of the chicken in layers, arrange the remaining chopped coriander leaves, mint leaves and fried onions on top of the rice, sprinkle rose water, kewra water, saffron milk and add fried cashews.

6. Put a thick cloth on top and cover with the tight lid or you can also seal the lid with chapathi dough.

7. Keep it on high flame for the first 15 minutes and simmer the flame and let it cook for 30-45 minutes. You can also keep the pot on a heavy bottomed pan so the pot is not directly on fire and the chicken won't burn at the bottom of the pot.

8. Let it cool for 15 minutes. Open the lid and check the rice it would have turned fluffy and fully cooked. Gently mix the chicken and rice together and serve with chilled Cucumber Raita.  


Simple Cucumber raita:
Finely chopped onion: 1
Finely chopped green chillies: 2
Finely chopped/grated slender long cucumber: 2
Chopped Coriander leaves: 2-3 tbsp
Salt to taste
Chilled Yogurt/Curd: 3 cups

Mix all the ingredients together and chill in the refrigerator.
Please click here to know how to make biriyani powder.--> Fresh Biriyani Powder in a Jiffy
Read More »

Wednesday, November 4, 2015

Mavinkayi Chitranna | Raw Mango Rice

1
Mango rice is one of my favorite rice dishes. I have tried many recipes from Internet but found the perfect recipe in my favorite blog Monsoon Spice. Sia is my favorite blogger, I admire her blogging, photography and her recipes. In fact she is the one who suggested that I should create my own blog and I took it seriously :D 

I have made small changes to the original recipe, I always make this rice with raw mango. Sometimes I add broken cashew nuts to the tempering that adds a rich flavor to the rice. Today I have added a lot of peanuts. Thats how my family likes it:)


Prep time: 10 mins | cooking time :20 mins.
Recipe type: Rice, main course
Recipe source: Monsoon Spice 

Ingredients:
1 raw mango grated (with the peel)
2 cup long grain basmati rice, 
2 medium onion finely chopped
1 inch ginger finely chopped
3-4 green chillies finely chopped
1 sprig Curry leaves 
2 tbsp Coriander Leaves finely chopped
2 tbsp mint leaves finely chopped
1 tsp lemon juice
2 tbsp ghee
1 tsp urad dal
1 tsp mustard seeds
1 tsp cumin seeds
1/2 tsp turmeric powder
3 tbsp ground nut 
Salt to taste
1/2 tsp sugar (optional)


Method:
1. Wash and soak rice for 30 minutes.

2. Heat 1 tbsp ghee in a pressure cooker and add soaked rice to it and fry for a minute, add 4 cups of water and salt. Cook for 2-3 whistles and turn off. Let the rice cool down.

3. Heat 1 tbsp of ghee in a pan and add mustard seeds, when it splutters add peanuts and sauté. Add urad daal and fry until it's golden brown in color, add cumin seeds and let it splutter.

4. Mix in curry leaves and chopped green chillies and fry for 30 seconds.

5. Add ginger and onion and fry until onions turn translucent.

6. Add turmeric powder,sugar, salt and grated mango and mix well. Add mint leaves and half of coriander leaves. Cook for 3-4 minutes and turn off the flame.

7. Mix in rice and add remaining coriander leaves and lemon juice. Combine everything well and the delicious mango rice is ready to devour :-)

Serve hot with pickle, chutney or raita.

Notes:
1. Adjust lemon juice and sugar based on the sourness of mango.
2. As a variation I fry a piece of cinnamon, 2 cloves and 2 cadamoms in ghee before cooking the rice to give a subtle spice flavor.


Read More »

Tuesday, November 3, 2015

Coconut Rice | Flavored rice cooked in coconut milk

0
Coconut rice a traditional South Indian recipe. It's an easy one pot rice recipe cooked with flavorful tempering and creamy coconut milk. It goes really well with spicy potato curry or chicken curries. I make this easy dish when I am not in a mood for elaborate cooking. I use ready made coconut cream, you can also make it with fresh milk extracted from grated coconut.


Ingredients:
Rice : 1 cup
Onion : 1 finely chopped
Garlic : 3-4 cloves finely chopped
Ginger : 1 inch finely chopped
Green chillies : 2
Thin Coconut milk : 2 cups
Coconut oil: 1 tbsp
Cinnamon: 1 stick
Clove : 2
Cardamom: 2 
Peppercorns: 5-6
Salt to taste

Method:

1. Wash and soak rice for 30 minutes, drain water and keep it aside. 

2. Heat oil in the pressure cooker add cinnamon, cardamom, cloves and pepper and fry until the oil is fragrant.

3. Add garlic and ginger and sauté until the raw smell disappears. Add onion and green chillies and fry until onions turn translucent.

4. Mix in rice and fry it for 2 mins, add coconut milk and salt and pressure cook for 2 whistles.

5. Mix and serve with chicken or veg stew.

Notes: 
1. You can replace coconut oil with vegetable oil.


Read More »

Thursday, October 8, 2015

Chitranna-Lemon rice

0
Chitranna or Lemon rice needs no introduction. It's the simplest yet the delicious recipe from South India. A great savior when there is no time for elaborate cooking or when you have leftover rice:)

Steamed rice tempered with aromatic ingredients and flavored with tanginess of Lemon juice gives the freshness to this simple rice dish. It's a great lunch box option too. There are different ways of making it. This is my quick fix 5 minute recipe without onion and garlic.


Ingredients:
Rice: 1 cup
Oil:2 tbsp
Peanut: 3-4 tbsp
Split black gram: 1 tbsp
Mustard seeds: 1 tsp
Cumin seeds: 1 tsp
Asafoetida: 1/4 tsp
Green chillies : 3-4
Curry leaves: 1 sprig
Turmeric: 1/2 tsp
Salt to taste
Lemon juice: 2 tbsp
Coriander leaves for garnish


Method:

1. Cook rice with 2 cups of water. Cool it and separate grains with the help of a fork or use leftover rice.

2. Heat oil in a Kadai and fry peanuts, black gram, add mustard seeds and cumin seeds and sauté.

3. Add asafoetida, green chillies and curry leaves and fry for 30 seconds.

4. Next add in turmeric and salt, give a quick stir.

5. Reduce the flame and mix in rice and squeeze in lemon juice, cook for a minute and turn off the flame.

6. Garnish with coriander leaves and serve hot.


Read More »

Friday, October 2, 2015

Mushroom Dum Biriyani

2
Who doesn't love biriyani? It's a mixed rice dish with a lot of Indian spices, rice and meat or vegetables.

Chicken biriyani is a favorite at home and I tried to make vegetarian version of it with mushrooms. It tastes absolutely delicious and so much like the ones served in the restaurants.


This can also be cooked with paneer, mixed vegetables or eggs. It's a dum version where the mushroom gravy and 3/4 th cooked rice are layered in a thick bottomed pan with a tight lid and dum cooked. I have used rose water, Kevra water and saffron that add distinct flavor to any biriyani. The list of ingredients is a bit lengthy but most of them are commonly available in Indian kitchens:-) 


Ingredients:
Long grain basmati Rice : 2 cups
Button Mushroom: 200 gms
Fried Onion: 1 cup
Cinnamon stick :1
Cloves :4-5
Green Cardamom: 3
Cashew: 10-15
Red chilli powder: 1/2 tsp
Coriander powder: 1 tsp
Cumin powder: 1/2 tsp
Garam masala: 1/2 tsp
Oil/ ghee :2-3 tbsp
Salt to taste
Coriander and Mint leaves: 2 tbsp for garnishing 
Optional:
Saffron: 1/4 tsp
Milk: 2-3 tbsp
Rose water: 1 tsp
Kewra water (screw pine water): 1 tsp

To grind to smooth paste:
Medium Onion: 2 
Tomato : 1
Ginger: 2 inches
Garlic: 4-5 cloves
Coriander leaves: 3/4 cup
Mint leaves: 1/4 cup


Method:
1. Wash and soak rice in enough water for 30 minutes. 

2. Warm milk and soak saffron in it and keep aside.

3. Grind onion, tomato, ginger, garlic, coriander and mint leaves to a smooth paste in a blender and keep aside.

3. Heat oil/ghee in a pan and add whole spices - cardamom, clove and cinnamon and fry until the oil is fragrant.

4. Add ground paste and sauté on medium flame until the raw smell disappears and oil separates. Takes about 4-5 minutes.

5. Mix in red chilli powder, coriander powder, turmeric and garam masala and mix well.

6. Add quartered button mushrooms and salt. Mix properly so that all mushroom pieces are well coated with masala. 

7. Cover and cook for 10 minutes. Keep stirring in between. Sprinkle little water if the masala is sticking to the pan. Turn off the gas and keep it aside.

8. Boil water in a large pot and add salt, shahi jeera (black cumin) and a tsp of oil and add soaked rice. Let it cook 3/4th. When rice grains start popping up, press the rice and check. It shouldn't be fully cooked.

9. Drain the water and keep the rice aside.

10. Take a thick bottomed pot with a tight lid and arrange rice and mushroom masala in layers. Put one layer of rice first and sprinkle some fried onion, chopped mint and coriander leaves and add a layer of mushroom masala. Repeat with rice and then mushroom and finish with rice layer on top.


11. Sprinkle remaining fried onion, fried cashew nuts, saffron milk, rose water and Kevra water. Close the lid and keep it on low to medium flame and cook for 15-20 minutes.


12. Open the lid and check the rice grains on top. If it's done turn off the gas and garnish with remaining chopped mint and coriander leaves. 


13. You can serve the dish as it is with layers or Mix them up and serve hot with cucumber raita.

Cucumber Raita:
Beat 2 cups of yogurt, add chopped onions, cucumber, finely chopped green chilli, coriander leaves and salt. Chill and serve with biriyani.

How to fry onions:
1. Finely slice onions and sprinkle some salt and sugar and keep it aside for 15 minutes.

2. Squeeze out extra water and deep fry the onions in hot oil. Remove on paper towel to get crispy fried onions.

3. This can be stored in airtight jars in the refrigerator for 3-4 weeks.

Notes:
If the pot doesn't have a tight lid you can cover the edges with some chapathi dough.

If the pot is not thick bottomed keep it on a heavy pan and then turn on the flame. This way the pot won't be on fire directly and the heat will transfer from pan to the pot and you can avoid chances of biriyani sticking to the bottom of the pot.


Read More »

Thursday, September 17, 2015

Ghee Rice

0
Clarified butter or ghee rice is a very popular one pot rice dish. Rice grains roasted in ghee along with whole spices, cashew and raisins gives it a very unique taste. In coastal Karnataka it's usually served with spicy meat curries like chicken ghee roast, mutton korma or any other chicken curry. It also goes well with potato or any veg curry.


Ingredients:
Long grained rice: 2 cups
Ghee (clarified butter): 1/2 cup
Onion: 1 medium
Green chilli:1 (optional)
Green Cardamom: 3-4
Cloves : 3
Cinnamon : 1 inch sticks 2
Cashews : 10-12
Raisins : 2 tbsp
Lemon juice : 1/2 lemon
Salt to taste
Water: 4 cups

Method:

1. Wash and soak the rice in enough water for 30 mins. Drain water and keep aside until needed.

2. Slice onion and slit green chilli and keep aside.

3. In a nonstick pan heat ghee and fry cashew and raisins for 30 seconds.


4. Add cardamoms, cinnamon and clove and sauté until the ghee becomes aromatic.

5. Add sliced onion and green chilli and sauté until the onions turn golden brown.


6. Add soaked rice and fry until all the rice grains are covered with ghee and get roasted, it takes about 2-3 mins.


7. Add 4 cups of hot water, salt and lemon juice and mix well. Lemon juice helps to keep the grains separate.


8. Cover with lid and cook until the rice is done.

9. Serve hot with spicy curry of your choice.


Notes:
1. You can cook it directly in pressure cooker, in that case add 3.5 cups water and turn off after 2 whistles.

Read More »